Welcome to the Highlander Studios blog.
I won't promise any earth shattering revelations here. What I will be trying to do is post some new products as I release them, share some thoughts on gaming and show some pics of games and other stuff that I enjoy. So come in and make yourselves at home.
Sunday, September 9, 2012
Afternoon Quickie
One of the really quick projects I wrapped up this weekend was a small conversion of the Space: 1889 British troops.
These guys have been armed with the latest Lee-Metford no. 9 chemical pulse rifle.
I'm also working on gas masked versions for those who want a more steampunk look to their troops.
Wednesday, September 5, 2012
Building the Perfect Beast
About a week ago my head exploded. I was picking away at a couple of commissions and my mind started assembling items that I had seen or had been pondering for several weeks. I ended up with 10 new sculpts on the table with no great amount of progress on any one thing. So now that the armatures are made and the images firmly seated in my mind I can go back to the work that has to be done for a few weeks. I'll tell you more about them in future posts.
One item, however, was the ruumet breehr sculpt I had been avoiding for several months. It's a larger piece so I don't feel guilty working on it a little when the putty starts getting too stiff to apply to the human-sized 15mm work. For those who aren't familiar with the Space: 1889 setting, the ruumet breehr is a large elephant/ cow beast of burden on Mars. It is used to carry howdahs, tow artillery and pull the great caravan wagons from place to place.
 |
| from Space:1889 rulebook |
The problem I was having with starting this creature was the same problem I had with the gashant. The illustrations were not the most interesting and left a lot more questions about anatomy and bone structure than they answered. While looking through the Caravans of Mars book I ran across a small drawing of one that finally made sense to me.
 |
| from Caravans of Mars |
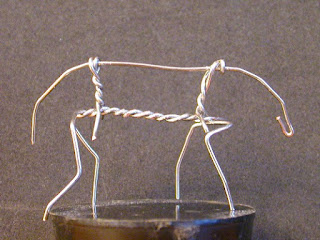
Using the first picture for height and length and the second for the general anatomy, I started building the armature.
It's pretty big and I hadn't decided on metal or resin for the finished product. So I decided that it would be free standing, at least for now, and started bulking him out with Apoxie Sculpt.
Here is the first layer over the armature with a British soldier for size comparison. I chose to make him a little taller and slightly shorter than in the first drawing. It seemed a good compromise between the several reference pictures I was able to find. It also makes the beast big without being overly large for casting in metal if I need to go that route. The second layer of bulk was added the next day.
I was also able to start laying in a bit of head structure with the Pro Create putty. Armatures are all well and good... all right... they are often critical for getting the proportions and pose the way you want them, but I was really excited to get down to the surface detail work.
There is a point in the cure time where the putty is too stiff to apply to the finer wires and features of the smaller sculpts. I usually keep a piece of terrain I'm building handy to use up the hardening putty. But this beastie serves the purpose beautifully. I can push and pull the putty around on the solid body for quite a lot longer.
Here's the latest layers applied. I was working out the foot and leg structures and getting the head closer to it's final shape.
This last is a picture of the same work from a similar angle as the second drawing. Things are progressing nicely, but I'm still troubled by the choice of resin or metal for the casting. I'd like to have it done in resin, but I'm nowhere near ready to do that myself and the metal can be done reliably. I guess I can always have them made in metal first and produced in resin later on. I'd like to get some metal masters for conversions later anyway. We'll see how it all goes.
That's all for now. I'll post more pictures in a week or two when it's close to being finished.
Subscribe to:
Posts (Atom)


