Welcome to the Highlander Studios blog.

I won't promise any earth shattering revelations here. What I will be trying to do is post some new products as I release them, share some thoughts on gaming and show some pics of games and other stuff that I enjoy. So come in and make yourselves at home.


Tuesday, June 17, 2014

A Time to Paint


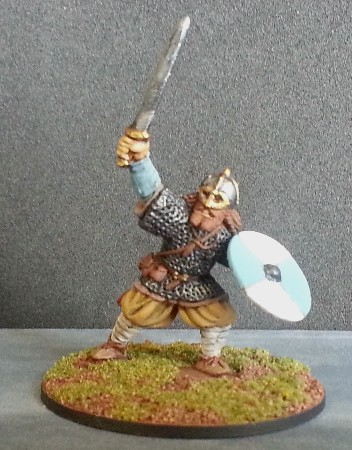
     Even with all of the work and travel going on here this spring I managed to find some time to paint. I'm working on a few orders for clients. One is a 6pt. Viking warband for Saga. Here are the first of the war leaders.


     These are Gripping Beast. The sculpting isn't the greatest (hooves instead of feet and horrendous work on the hands) and it looks like the molds are worn on some of the models. What I like about them are the poses and the ease of painting. They have character and look good on the table top.

     I also managed to finish up one of my favorite packs from Parroom Station. The Martian Stinger, two-man flier, was released sometime last year. I enjoy most of the Parroom Station figures, but these little fliers just grab my imagination.


     I'll be purchasing more to put in the display case at shows and for my own games. I'm currently working on one in blue. Anyone interested in having some painted, please email me at Highlander Studios, Inc.


Saturday, June 14, 2014

Spring Break (Part 2)


     During this hiatus from sculpting I made it my goal to do between 1 and 5 hours of physical labor 5 days a week. I built some shelves in the basement and assembled my table saw. There was also a lot of moving things around in the basement on rainy days. During the fairer weather I was busy outside.

     Several years ago a Japanese Knotweed volunteered itself in the corner of our yard. I'm not sure what the actual species is, but it grows literally like a weed and takes over most of the yard within a month. The plant sends out rhizomes and each individual rhizome can grow to about 2 inches in diameter and 8' to 9' tall. It's some crazy shit.

    We've mowed them, pulled them out by the roots, poisoned them several times and they still come back. The largest concentration seemed to be in the area between our parking pad and the neighbor's garage. So... I waged a little personal war and the battle of Knotweed has begun.

     I started by clearing all the weeds in that area. then digging down to get to the rhizomes.


     I got down about 5 inches and found a layer of asphalt. Ok, it was cracked so I started pulling it out. Beneath the asphalt was a layer of concrete. Tougher going, but not impossible. Under the concrete was the original layer of bricks that had paved the whole back area once upon a time. More fun. I also found out that this was where the original owners dumped the slag from their coal boiler.


     Mixed in with all of that crap was the knotweed rhizome and I still hadn't found the bottom of that. I ended up digging down about 20" to 24" to try to get most of it. I removed yards and yards of the stuff and was left with a big trench.

     Our garbage guys won't pick up construction waste. So I made rubble out of all of it and back filled the trench leaving 8" to 10" at the top for the dirt and clay.


     All told I moved about 5 cubic yards of material. Twice. The knotweed is mostly gone, but I still have some work to do to remove the last remaining rhizomes before they spread again.

     The fun project in all of this was to start building a forge on the back pad. I used Rhino CAD to make a rough drawing of what I wanted.


     The bricks were purchased at our local salvage shop. I dry stacked them and decided I needed a 2' x 2' paver to build on. That will allow me to move the forge if code enforcement guys wanted to make a fuss. 


 I did a lot of reading about masonry before I started, but as with all things, theory just isn't the same as practice. It was time to start throwing mortar.


     You can see the other neighbor's knotweed in the background. I got permission to keep that cleared out this summer. Anyway... I doubt that I'll ever become a master mason. But the base is solid, plumb and level. All that is left is to build the form to cast the firebox. I'm also planning to use it as a charcoal grill and that's what I'm telling the code guys if they show up.

     Until the fire box is built, I still get to use the base for one of it's intended purposes.


     It was a pretty fine dinner that night.


Spring Break (Part 1)


     Spring was interesting this year. I took about two months off from sculpting and painting while I dealt with some family, house and yard things. Some things were time sensitive, like getting the garden in and planning my sister-in-law's vacation away from us. Others were things in which I simply wished to indulge.

     The most important project was building the garden boxes and getting the planting done. Susan and I have been reading Square Foot Gardening by Mel Bartholomew. His plan is pretty simple so we decided to try it. Please note that when I say we on any of these projects, Susan helped fund them, but I did all of the labor. Anyway, here are a few photos of the work as it progressed.


     The boxes are built from 2"x6" framing pine. I had some paint left over from a sea gaming board I made a while ago so they got painted blue.


     We trucked in about 600 lbs. of potting soil, peat moss and compost to fill the boxes. Then they were gridded and planted. The grid provides the spacing for the individual types of plants. Some need a full foot between them, others need 9, 6 or 3 inch spacing.


     We decided to put in tomatoes, hot peppers, green and black beans, spinach and some herbs. The tomatoes and Franken-beans (GMO hybrid seeds) are growing like crazy. The spinach is having a rough time. The herbs are well with the exception of the basil, which bums me a bit since that's my favorite. We've had a lot of rain and some of the plants just don't seem to like too much water.

Black beans, peppers and the ailing spinach.
Tomatoes and herbs.
Franken-beans and more peppers.

     I also got the bug to try growing hops. I ordered two cascade rhizomes and planted one vertically and one horizontally to see which worked better. The horizontal showed sprouts about a week sooner than the other, but both are doing really well.


     All in all, this raised bed gardening took a bit of work and about $200 to get set up. But now I take my first cup of coffee and walk out every day to survey my realm. Five minute of removing any volunteer plants and another five of watering if it hasn't rained recently and the gardening work is done for the day. It's almost as if I'm cheating.